Monday, April 25, 2011

RAMPS!!!


These are the gorgeous ramps I came across this past Sunday at the Farmer's Market outside the American Museum of Natural History.

And this is the AMAZING dinner I just made with them.

Here's the scoop:
I first found ramps at DePiero's, a market I've mentioned many times before. That was three years ago. I had heard about this seasonal item on Top Chef a few seasons before. (Casey was really excited to find them at the store and planned her whole dish around them.) I'd never heard of them, but I always get excited when I find some new produce variety to try. That first time I found them I bought a large bunch with no knowledge and no plan. Thanks to my trusty friend Internet, I found this recipe. I made it with those first ramps, and it quickly became a seasonal favorite of both my husband and myself. I've made this dish about twice a year since then-- a total of six or seven times. Once or twice I substituted different fish, but basically have made very few changes to the original recipe.

Salmon with Spring Leeks in a
Wild Mushroom Wine Sauce
Adapted from The Forager Press

Ingredients:

Salmon Filets for four people (I use about 1 1/2lbs)
Juice of half a good orange
Zest of the same orange
1/2 to 3/4 lb of fresh wild mushrooms (I use a mix of whatever looks best at the market. Today it was trumpets, clam shells, and oyster mushrooms)
1/2 cup of white wine
1/2 cup of vegetable or fish broth
1/4 cup of heavy cream (half and half is totally sufficient)
3 Tbsp butter

And here's the magical ingredient:
About 1/2 pound of ramps
The original recipe calls for these two items:
1/2 clove of finely chopped garlic AND 1/3 cup fresh Leek greens sliced across in 3/4 inch strips.
I use the bulb of the ramps IN PLACE OF the garlic and the leafy tops for the greens as noted. 1/2 lb of ramps yields much more than 1/3 cup of greens. If you want a milder flavor only use 1/4 lb of ramps.

Directions:

1. Put the Salmon on a plate and cover with the orange juice. Sprinkle with salt and set aside.

2. Chop the mushrooms to bite size. Slice the ramp bulbs crosswise into small discs. Slice the leafy part of ramps into 1 inch strips.

3. Melt 2 Tbsp of butter and add the ramp bottoms until the butter is bubbling around the pieces.

Add the mushrooms. When the mushrooms are softened and starting to brown, stir in the leek greens until wilted and dark green.

4. Add the stock and wine and reduce by half.

5. Use remaining Tbsp of butter to dot the top of salmon. Place under the broiler for about 8 minutes while reducing the sauce.

6. When reduced add the cream and season with salt and fresh ground black pepper.

Spoon the mushrooms onto plates

and place the fish on top. Garnish with orange zest.

Serve with roasted potatoes.


Ahhhhh. That's me sighing a big I'm so-full-of-something-so-good sigh. Ahhhhhh. There it is again.

Tuesday, April 12, 2011

Smocked Dress


Sometime last week I stumbled upon this dressmaking tutorial. I watched the video posted there and set out to get some fabric. I found a great, oversize print with lots of bright color. For the real tutorial, watch the video here, it makes the whole process basically foolproof. Below is just a speed through of my first run with this pattern. It couldn't have been easier; this first try took about an hour start to finish. The one I made is sized for a 12 month old, but the same amount of fabric and sewing, with some minor adjustments, could easily have made one for my almost-four-year-old.

Mark the lines for your elastic with water soluble marker.

Sew along the drawn lines with elastic thread in the bobbin.

Spray with water, press with hot iron. Elastic will shrink, as at the right in the above photo.
This part is really cool and sort of magical.

Attach your straps (or go strapless if you're that kind of gal, wink wink) while sewing the top hem down. A strapless one would be a great beach cover-up.

This one is all ready for my little one to romp around in this summer. And because it took so little time, I don't even feel bad about making it before the rest of the stuff on that dreaded list.

Monday, April 11, 2011

Tiered Dress: Take Three

This one's for my turqouise loving niece, and was also on that finish-me-before-Passover list. I was hoping to surprise her with it when our family gets together this weekend, and I'm so happy that it got finished today. Yippee!!

The skirt is made just like these, but the top is an Old Navy tank top. It's stretchy and comfortable, and I think will help the dress fit her for a longer time. To dress it up a bit I made two fabric broaches that can be placed individually or clustered on the jersey top.

These make a big difference, and I think it's always fun to be able to change up the look a bit. Here are a few of the fun options:
I can't wait to deliver this! And, in case you're wondering, the yellow square was a personal request by my daughter, she-who-loves-all-things-yellow. With nearly 150 squares in this skirt, why can't one of them be a little different? I think it's a fun surprise, and it will remind my niece how much her little cousin loves her.

Prepping for a Passover Pageant

There are always more projects waiting in the wings. I'm usually working on one or two crafts at a time. Recently, I realized I was working on about a dozen items simultaneously, and most of them need to be finished by the end of the month! I actually had to make a list in order to keep my head straight about it all. One of the items on the top of the list was a set of Passover costumes. This project was most time sensitive, as Passover starts early next week.

When my mom asked if I would be able to make some sort of Passover costumes this post about Christmas Pageant costumes on Design Mom served as loose inspiration. I liked the way each character had a preorganized set of pieces to wear. I decided to make a simple set of tunics/ponchos that slip over your head. I wanted them to be able to fit anyone so the sides are open and the tunic closes when tied with a sash. Also, going back to this philosophy of costumes for little kids, each character has a similar set of 4 pieces: tunic, belt, hood, and headband.

I chose linens for the Hebrew slaves and brocades for the Egyptians. This was a fun chance to get some of that wacky metallic fabric that I like to look at but don't usually have a need to buy.

Here are all the fabrics for the tunics ready to go:
Below are some pictures of the completed sets.
An Egyptian Taskmaster and a Hebrew Slave.

Aaron and Moses.

A dark and powerful Pharaoh. This is the only set with an additional piece, this great headband.

All nine costumes, four Egyptians and five Hebrews.

Here's a shot of one set laid out. This is the costume for Batya, Pharaoh's daughter.
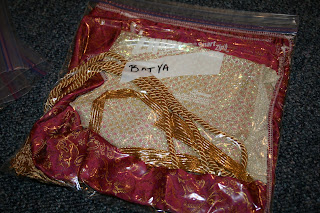
Each set of pieces is now in it's own Ziplock bag all ready to go. I'll be sure to post some photos of these costumes in action. In the meantime, I'm off to cross something else off my I-need-to-make-this-soon list. Happy crafting to you!