Tuesday, September 28, 2010

Leah's Quilt-Part II

Apparently, there's nothing quite like the public promise to do nothing else until a project is complete. Indeed, I had barely posted that commitment when the sheer pressure to get this thing sewn so my nearly-five-month-old can roll around on it lit a serious fire under my rear end. The quilt's not done yet, but (drumroll, please)...

The top is finished!
Once all the horizontal rows are sewn together, it's time to start going vertical. This is the step where it's really important to line up the corners of each block. That's why, even though I admitted yesterday to avoiding pinning whenever possible, I pin the heck out of these rows.

Start by lining up the seam for one corner. Pin the rows, right sides together, at the intersection of seams. Then work your way across the row filling in with pins every few inches.

Sew the rows together. Repeat until all rows are attached, and VOILA! The top is complete.

What lies ahead is the least fun, and perhaps most physically uncomfortable step of quilt making. Tomorrow I will lay out the layers of my "quilt sandwich" and safety pin this sucker within an inch of its life. But in the meantime, I'm just going to celebrate the simple fact that after five months, Leah's quilt is well on its way.

Monday, September 27, 2010

Leah's Quilt-Part I

I've mentioned before that I have a shelf in my studio dedicated to storing works-in-progress. Most of them are of no particular origin, nor meant for any particular destination. Therefore, the projects' lingering status in purgatory doesn't weigh on me too much, other than my wanting to buy more fabric- which I won't allow myself to do until some of what I have has been used. For all you quilters and textiliphiles out there, you know just how hard that is. There is one project, however, in the studio right now, that is approximately 4 1/2 months overdue for completion. That is the baby quilt for my second child, Leah.

Ok, I'll cut myself a bit of slack. I wanted to choose the fabric with my husband, and we couldn't do that until I was so pregnant it was nearly impossible to sit at my machine. But the blocks have been complete since about two weeks before she was born. They've even been nicely arranged on my batting board all ready to go since then. This picture is dated April 29th.

Leah was content for about four months to just lay on her back and make some noise, mostly pleasant and calm. She recently began to rock her tummy time, and just rolled over for the first time two days ago. I figure I'd better get this blanket finished if there's any hope of her actually playing on it before she goes mobile. Here is an account of the quilt top construction to date. And, as I won't allow myself to buy any new fabric until some projects are done, so I won't allow myself to post about anything else until this particular quilt is complete.


1. Carefully recheck each block for square-ness- this is definitely a measure twice, cut once situation.
2. Put two blocks, right sides together, with the sides lined up. I hate pinning, so I rarely do it, but make sure these edges remain aligned.
3. Sew a 1/4 inch seam and press open. In addition to pinning, I also hate pressing seams open. I know I'm not the only quilter to avoid this step if possible. But I want this quilt to be EXTRA nice, so I'm going the extra, if annoying, mile.
4. Repeat for the entire horizontal row of blocks. Press the row flat.

Now I've got three out of five rows complete.

Signing off to go sew the last two. Wish me luck.

Wednesday, September 22, 2010

Spinach Bread

I've been inspired lately to explore some new recipes:

I made these Lemon Meringue Bars
(I swear there's lemon-y goodness under all that fluff)
my second whole roasted chicken
(which was delicious even though, or perhaps because, I roasted it breast down by accident)
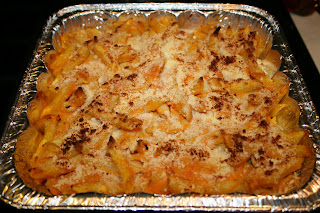
a version of this Butternut Squash and Parmesan Pasta
(the orange is squash, not cheese)and this Spinach Bread.
This bread could not have been easier, and yields lot of bang for your buck in terms of flavor and presentation. You can add cheese, either to the filling or on the top. I wanted to keep mine dairy free.

Spinach Bread
Adapted from allrecipes.com.
Ingredients:
1 ball pizza dough- you can get this in the freezer of your local supermarket, but today I got a fresh ball from our pizza place.
1 pkg frozen chopped spinach. Thaw and drain excess liquid.
4 cloves garlic, chopped. I go by the old Kreiger motto "needs more garlic." You could certainly use less.
Salt and pepper
Olive oil
Garlic powder

Directions:
1. Preheat oven to 350 degrees F. Spray a baking sheet with non-stick cooking spray.
2. Heat olive oil in a skillet or frying pan over medium heat. Add garlic and saute until soft, about two minutes. Add spinach and cook until liquid has evaporated. Stir in salt and pepper. Remove from heat and let cool.

3. Using a rolling pin or your hands (like I did) form a large rectangle out of your pizza dough.
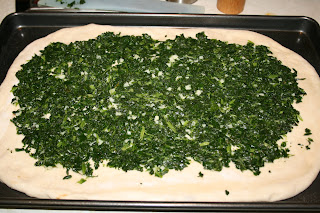
4. Spread spinach mixture on top
of dough. Be sure to leave an inch or so of dough border around the filling.
5. Starting from one long end, roll up the crust to make one large loaf. Pinch ends to seal. Place loaf, seam down, onto prepared baking sheet.
6. Brush top of loaf with olive oil. Sprinkle wit h salt, garlic powder, and parsley flakes.
7. Bake in preheated oven for 20 to 25 minutes, or until golden brown. I suggest serving with some kind of tomato sauce. I made it today as a side dish for a pot-luck, where it flew, by the way. But I think I'll make it again to serve with a hearty bowl of my husband's yummy meat sauce. I'm also inclined to make a similar roll with grilled veggies and fresh mozzarella. Mmmm. Though I mentioned that idea to my aforementioned hubbie and he said just to make the yummy spinach one again. As long as he tells me when it's stuck in my teeth, I'll make the spinach one as often as he wants.

Tuesday, September 14, 2010

A New Year, a New Menu

A few years ago my husband and I bought our first home. Along with the mortgage we acquired the responsibility to negotiate hosting duties for holidays. For the most part, we're content to celebrate at the homes of our family members who've been hosting for years. Only in the case of Thanksgiving did our home even become an option, and we're now in the rotation to host Thanksgiving perhaps every four years.

Last week we hosted our first Jewish holiday. As parents of young children we felt, as I imagine many do, that it was time to establish some roots of our own. Who knows how to put down community roots? For us, part of that meant finally committing to a synagogue by joining one. Once the hard work of choosing the right place was done, we felt it was important to see what that place was all about, and not just on Tot Shabbat. So with High Holy-Day tickets on their way (yeah, tickets. Weird.), we began to plan the menu for the first meal of the holiday season.

After perusing a number of cookbooks--that number being three, we settled on a menu that seemed traditional enough that people would eat the food, but new enough that it wouldn't be boring to either make or eat. Never one to shy away from a kitchen adventure (just ask my 3-year-old how many times we've cleaned up flour), we ultimately decided on three new recipes:
Rice Pilaf with Mushrooms*
Snap Pea, Asparagus and Turnip Ragout
and
Honey Mustard Glazed Cornish Hens*
*from Kosher By Design


I actually really enjoy cutting vegetables, and this counter-full of prep bowls made me smile.

Snap Pea, Asparagus and Turnip Ragout
from Alice Waters' Chez Panisse Vegetables book
Ingredients
2 cups snap peas
3 spring onions (I used large scallions)
20 asparagus spears
10 baby turnips
2 carrots
2 Tbsp olive oil
1 Tbsp unsalted butter
salt and pepper
1 1/2 tsp chopped garlic
1 c vegetable stock or water
1/2 lemon
I know it looks simple, and it is easy to make. But it's so much yummier than you might think.
Directions

1. Trim and peel vegetables. Slice so all are about the same size, about 1/4 inch thick. Asparagus, snap peas and carrots can all be sliced on the diagonal.
2. Parboil carrots for a minute in salted water.
3. Heat a large saute pan and add olive oil and 1/2 of the butter. When oil is shimmery-hot start adding the vegetables: turnips first, then snap peas, onions, asparagus, carrots. Toss regularly. Cook each briefly before adding the next. Add salt and pepper. Taste for doneness and seasoning. Vegetables should be just tender. Add garlic. Continue tossing, and when you begin to smell the garlic, remove vegetables from pan.
4. Deglaze the pan with stock or water and add remaining butter and a squeeze of lemon juice. Let sauce reduce by 1/3 and pour it over the veggies.
Dig in folks, for a sweet new year.

Sunday, September 5, 2010

Don't Slime Me

When I was picking up my daughter from day care, the director and I began discussing a favorite market of ours nearby. DePiero's is an amazing market that is filled with seasonal produce most of which is grown locally. The director told me she loves DePiero's because she can get good okra there year round. Okra is one of those vegetables that I see at the market often, but have never bought. The number of items on that list is certainly dwindling, but okra remained. So I asked this woman for some simple okra cooking instructions, and the recipe below is my interpretation of her idea.

Ingredients
20 pieces of okra. Look for okra that is bright green, firm but not hard, and no longer than 4 inches long. I'm no okra expert, but according to many online sources 4 inches is the limit before the okra has been left to grow for too long. What happens after that, I have no idea.
3 vine ripened tomatoes
2 fresh ears of corn
1 small sweet onion
olive oil

Directions
I found that there was enough time to prep the next vegetable while each step was cooking. There's no need to prep everything at the beginning. Season lightly with salt and pepper after adding each vegetable.

1. Heat a large saute pan over medium heat. Add 1-2 tablespoons of olive oil. While the pan and oil heat up, cut the onion into a medium dice. Add the onion to the hot oil and saute until transparent.

2. While onion cooks slice the okra into 1/4-1/2 inch cylinders. Add okra to the pan. It will be a bit slimy, don't be afraid! Stir occasionally.

3. Cut the kernels from the ears of corn. When okra is starting to look a bit darker and feels slightly tender when pressed, add corn to the pan. Stir.

4. Cut tomatoes into bit sized pieces. When color of corn has darkened slightly, add tomatoes to the pan. Stir and taste to check seasoning.

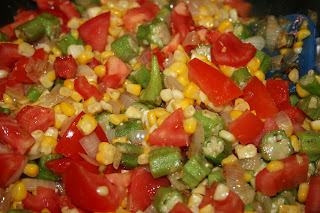
Done. The slime from the okra helps hold all of the small pieces of corn and onion together. I had the leftovers with pieces of a cut up chicken cutlet and it was an awesome summer lunch. I'm on the lookout for more easy okra recipes, but I think I might just have to bite the bullet and make some gumbo. I'll keep you posted.